Showing posts with label cards. Show all posts

Friday, April 20, 2012

April Earth Day Projects

So I decided that to celebrate Earth Day I would find things around the house and scraps that I had and create use them on my cards and scrapbook pages.

I gathered scrap paper, old magazines, and used dryer sheets 


In my card class we made 3 cards

I used the dryer sheet to make the flower on this card
 Turns out I have hundreds of used dryer sheets in my house.  I usually use then to dust and remove glitter from my craft table.  I had so many I figured why not try crafting with them.  I cut three circles out of the dryer sheet.  I used a stamping sponge to sponge color on one of the circles.  I used the colored circle in the middle and held all three pieces together with a brad.  I used a dimensional to attach it the card.  Super cute and it smells good.


We made the frame for this card using the scraps I had left from other projects.
First I cut the scrap into stripes and adhered them to a piece of card stock 4 1/4 x 5/1//2

Then I ran ran it thru the Big Shot using the framelits.


For this card I used the magazine to punch out circles and then I matted them on extra card stock.

 It was a nice way to use up my scraps and super easy.
Again, super easy and a great way to use up stuff I horde, I mean store :)


Thanks for looking.  Happy Earth Day.


Monday, May 2, 2011

Downline Day Card Swap

Cindy, my upline, had a special card making day at her house for all of the members of her downline.  We made some great cards using the Celebrations Simply Scrapping Kit. I am ordering a new kit to show my clients in June.

We also made some cards using the new Four Frames Stamp Set and the Paisley DSP.  The set and the paper will be in the 2011-2012 catalog and they are beautiful.

There are no pictures because I am not sure about the rules of posting other peoples work, but trust me it was all great.

Part of the day was a card swap.  Here is the card I swapped.


I really like this card because it is colorful and super simple.

Thanks for looking.

Monday, April 11, 2011

April Stamping Kids

My cute Stamping Kids Club is really creative. They especially out did themselves with class. I had to share what they made.

Here is the sample I showed them:


We made a special Mother's Day gift, which is wrapped in tissue paper.  I will show you what we made after Mother's Day, I don't want to ruin the surprise :)  We also made a little bag for the gift. 

The chick however was their creative outlet.  Here is what some of the girls made:


Are these adorable or what?!  When I made the sample, I did not anticipate how creative kids can be.  Love it!!

Friday, April 8, 2011

Wedding Day

My husband's cousin is getting married today, and like I need an excuse to make a card, I made them a card. 

I originally wanted to CASE the card with the two hearts, one is a bride, the other is a groom, but I don't have that embosslit ( and of course it will be on my next order, lol). 

I do, however have the butterfly one.

Here is the card I made:


  I think it still works with the butterflies.  ( I have been a little butterfly obsessed lately)

One of the butterflies is Whisper White, the other is vellum.  I used Melon Mambo because that was the color of the bridesmaids.  I gave it a little sparkle with the champagne shimmer paint.

I used:
Cardstock:  Whisper White, vellum
ink:  Melon Mambo
champagne shimmer paint, and daubers
Tulip Frame folder, and Butterfly Wings Embosslit

Congratulations to Kristen and Frank.

Monday, April 4, 2011

April Monthly Card Swap

Every month, a group of 12 demoes and I send each other cards. 

Here is the card for this month.

I am wishing for spring.


I love the little sentiment in the petal punch.

I didn't want to mail them, I liked looking at them all lined up :)

I used:

Cardstock: Wisper White, So Saffron base, Tempting Turquoise, Melon Mambo, Tangerine Tango, Pear Pizzaz
Inks: Tempting Turquoise, Melon Mambo, Tangerine Tango, Pear Pizzaz, Bashful Blue
Petal Card Punch, Linen Thread,  
Big Shot, Beautiful Wings Embosslit, Tulip Frame Folder 

Wednesday, March 30, 2011

March Stamping Kids

Stampings kids theme this month was Spring.

They made 2 cards, 1 basket, and 1 treat card

They colored in the flowers using the watercolor pencils.  The candy almost didn't make it into the cups, lol.

The mothers loved this little basket so much they made one for themselves :)


I had fun with the kids.  They get very excited.


I used:
Stamp Set: Punches Posies and A Flower For All Seasons
Cardstock: So Saffron, Pacific Point, Bashful Blue, Whisper White
Big Shot, Fancy Favor Bigz Dies, Organza Ribbon, Flower Brads

Order here.

Thanks for looking.

Thursday, March 10, 2011

MDS Thursday: Drop Shadow

This week was my friend (and upline) Cindy's birthday, so I decided to use MDS to make her a birthday card.

Here is the card I made and emailed her:


This card was fun to make because it gave me a chance to play with drop shadow.  It was interesting to find out the different looks you can get using the drop shadow feature in MDS.  Drop shadow works the same way for stamps, photo boxes, embellishments and punches, so once you learn it you learn it for many things.


First, I choose a stamp.  This one is from the Together Forever SS.  Then choose the Drop Shadow box in the Design Center, see red circle.


When the Drop Shadow window opens you can change the Opacity, Blur, and Color of the Drop Shadow. (see red circles) The changes you make can be seen in the box where the stamp is displayed.


NOW THIS IS THE REALLY COOL PART!!!    Hold down your pointer in the display box and you can move, yes move the shadow around. (see red circle) It's awesome!!!!!


Once you have placed the shadow where you like, click ok.

And Ta Da!!!!!  You have a shadow.  It looks like you are sponging the edges.


To create the shadow on the other side, I copied and pasted ( in place, not off set) the stamp and just moved the shadow to the other side of the stamp.

Go give it a try.  Thanks for looking.

Tuesday, March 1, 2011

March Monthly Card Swap

 On the first of every month myself and 12 other send out cards to each other.  I feel like a kid waiting for the cards to start coming in the mail.

Here is the card I sent out for the monthly card swap I joined.


Thanks for looking.

Tuesday, February 22, 2011

Downline Meeting

My upline Cindy had a meeting for us Saturday.  We learned to make a paper bow and a beautiful card using the Build A Blossom SS and punch  from the Occasions Mini Catalog. 

I will post some picks as soon as I make one that isn't a sample.  I wasn't very careful when making them, so  they are a little sloppy.

We also had a card swap, which is so much fun. 

Here is the card I made:


I like to keep it simple.

I used the Framed Tulips Textured Impressions Embossing Folder Die to create the frame.
I used glue dots for the Baja Breeze Glass Glitter.
I sponged the border with Baja Breeze ink.

The only "trick" I used was to create the embossing in the sentiment.  I don't have any craft ink spots, so I used versa mark ink.  First I placed the stamp in the versa mark, then in the Baja Breeze dye ink pad. Then I stamped the image on the card and embossed. 


Give it try.  Thanks for looking.

Monday, February 14, 2011

Happy Valentine's Day

Last week I had the first Stamping Kids Class.  Stamping Kids is a group of children ages 6 and up that want to create some cards and Valentine's.  We had a lot of fun.  They were better at stamping than I am, lol.

Here is what we made:

These have a Smarties inside

These have Dum Dums.

Some cute cards.
I wish I had some clever thing to write about the use of Smarties and Dum Dums but I don't. 

Supplies:
Cardstock:  Whisper White, Real Red, Pretty in Pink
Ink: Real Red, Melon Mambo
Punches:1-3/4 Inch Scallop Circle Punch  Heart-To-Heart Punch  Scallop Oval Punch
Big Shot Machine
Two Tags Stampin' Up! Bigz Die  
Scalloped Heart Of Hearts Stampin' Up! Embosslits Die

Give it a try.  Thanks for looking.

Wednesday, February 2, 2011

Monthly Card Swap

My upline, Cindy, created a monthly card swap.  What does that mean?  It means that for the next 6 months, on the first of every month, we will send and receive cards from the 13 people that signed up.  How exciting!!!!

They started coming yesterday.  It's been great and everyone has done a beautiful job.

Here is my card.


Thanks for looking!

Tuesday, February 1, 2011

Open House Cards

Friday January 28, 2011 I hosted an open house to introduce the Sale-A-Bration catalog.  I had a great time and everyone loved getting free products with their orders. 

Here are the cards I demoed for the open house.  I stayed true to the keep it simple.

This was the make and take card

This was the demo card


Thanks for looking.

Wednesday, January 26, 2011

Holy Scraps! pt1

Remember my scraps from the other day.  Here is my first creation.


I made a bunch of different types of flower using the scraps from the lattice punch.


Give it a try!  Thanks for looking.

Monday, January 24, 2011

Shoebox Swap

I had a great weekend.  I spent Saturday at a shoebox swap and boy did they have some great cards to share; I am looking forward to recreating some of the cards.

Thank you Rose for hosting and Cindy for inviting me.

Here is the card I made for the swap.


We had to make enough cards for 15 people.  Well, I cut 15 lattices and 


holy scraps!!!  I have never seen so many bits and pieces.

My mission this week is to figure out what to do with all these tiny pieces.  I have a couple of ideas already, I think I can make some pretty cool flowers.  Stay tuned.


But back to the card.


The card is pretty straight forward.  The only thing that may need explaining is the lattice.  I cut the lattice on the diagonal to create the wider shape. Then I adhered it to the strips of paper.

What I used:

Cardstock: Very Vanilla, Pacufic Blue, Blueberry Crisp DSP
Big Shot:  Lattcie Die, Perfect Polka Dots Textured Impressions Embossing Folder Die, Lots Of Tags Stampin' Up!
Punches: Word Window
Stamp: Sweet Birthday
Embellishments: Basic Pearls Jewel Accents

 Give it a try.  Thanks for looking.

Monday, January 17, 2011

Baja Breeze

My order came last week but I have been having a hard time trying to figure out where to start.  So, I closed my eyes, put my hand in the box and picked the first thing I grabbed.  The winner was Baja Breeze Glass Glitter.

It is chunkier than I thought it was going to be.  It turns out, glass glitter is the good old fashion glitter we had growing up.  Made me feel like a kid again.


Cardstock: Soft Suede, Baja Breeze, Very Vanilla
Ribbon: 5/8 Grosgrain Chocolate Chip
Stamp Set: Sweet Birthday
Big Shot: Perfect Polka Dots Textured Impressions Embossing Folder Die
Punches: Word Window Punch


Give it a try.  Thanks for looking.

Thursday, January 13, 2011

MDS Thursday: Changing Project Size

My intial post was going to be on how to make the snowman on this page.  However, when I realized I just made a card and not a scrapbook page, there was a change in plan.

PS- I'll post how to make the snowman next week.


It's been snowing quite a bit around here, so we have been stuck inside.  Except for when the kids and hubby are shoveling and sledding :)

What a perfect time to scrapbook!

I didn't want to start a new project so I click on one that was already created, not realizing it was a card.

Here is how to change your project size:

First Click on Edit in the Menu Bar, and choose Change Project Size.

Click on the scrapbook option, or which ever you want to change to.

A box with possible option will appear.  I clicked on the scrapbook .   Unfortunately it did not give me a 12x 12 option, so I choose 8 1/2 x 11.  I'll print it and mount it on a 12x 12 sheet background.

It will ask you to replace your current project or save as new.  I saved as new just in case the change was to weird.  I'll delete the card project later, or print it as cards for grandma brag books.


It will ask you to rename the project, click yes.

Done, click OK

Here is the new, bigger, project.  The words are now to small for the space so I changed the text size.

All done!! 

No mistakes, just opportunities for creativity and learning.

Ta Da!!

Thanks for looking.

Tuesday, January 11, 2011

Thursday, January 6, 2011

MDS Thursday: How to Make a Flower

I love when something looks complicated but is actually very easy. 


The "hard" part of this card is the flowers.  The truth is they were the easy part.

Big Bold Birthday Stamp Set
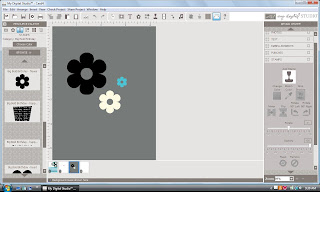
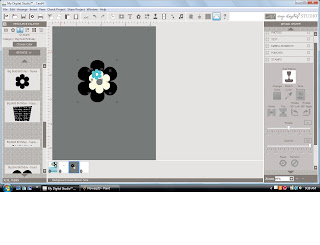
 I started by stamping, resizing and coloring the three flowers.  I used the flower from the Big Bold Birthday stamp set.  This stamp set comes with the program.  ( I used a gray background so you can see the white flower)

Stack the flowers together

I wanted it to look like one flower so I stacked them.  Then, because I am a perfectionist, I wanted them to be exactly center of one another.  I looked a little foolish trying to measure each side, moving a bit here, a bit there.  After some frustrating moments I gave up and started  to look for an easier way.  This is a digital software after all, shouldn't it do this for me :)


Using the Alignment Feature

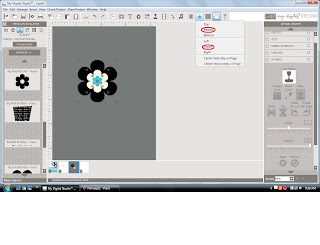
The alignment feature to the rescue.

First, you have to select all three stamped images. 
1. click on the first stamped image
2. hold the shift key
3. click the remaining objects, while still holding the shift key

Notice how the three objects are highlighted.

Once you've highlighted the stamped images, click on alighment and click middle and then center. It's actually kinda fun watching the flowers move on there own.  (see red circles)

Group the Stamped Images

We are almost done.

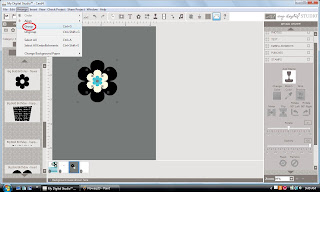
Once the flowers are all set, you have to group them.  This will turn them into one stamped image instead of three.

To group the stamped images:

1. make sure the three stamped images are highlighted ( just like before)
2. go to the Arrange tab in the menu bar
3. press Group (see red circle)


A flower is born

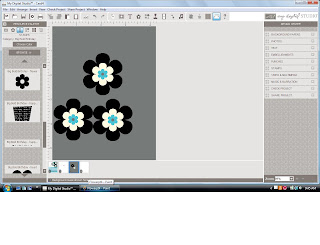
And, Ta Da!!!!!  You have a complete flower.

You can copy and paste as many as you like.  The one thing you can not do is resize it.  I am hoping that MDS will have an update for that soon.

Give it a try.  Thanks for looking.
Related Posts Plugin for WordPress, Blogger...